About The Legend of Zelda: Second Quest
The Second Quest is a more challenging version of The Legend of Zelda that becomes available after completing the game once, or by entering "ZELDA" as your name when starting a new game. While the overworld remains largely the same, the locations of items, dungeons, and secrets are completely different.
In this more difficult quest, Link still needs to collect the eight Triforce pieces and defeat Ganon, but the journey is significantly more challenging with tougher enemies and more complex dungeon layouts designed to test experienced players.
Second Quest Features:
- Completely different dungeon layouts and locations
- New secret locations and hidden passages
- Different item locations throughout the overworld
- More challenging enemy patterns and placements
- Requires advanced knowledge of game mechanics
- Puzzles that require creative thinking to solve
How to Access the Second Quest:
- Complete the First Quest, then continue when prompted
- OR enter "ZELDA" as your name when starting a new game
Basic Controls:
- D-Pad: Move Link
- A Button: Use sword/primary weapon
- B Button: Use selected secondary item
- Start: Pause game/access inventory
- Select: View map (when map item is obtained)
Second Quest Differences (Not in Manual):
- All dungeon layouts are completely different
- Dungeon locations on the overworld are different
- Secret room locations and contents have changed
- Many items must be found in new locations
- More challenging enemy placements
Maps & Locations: Second Quest
Overworld Map
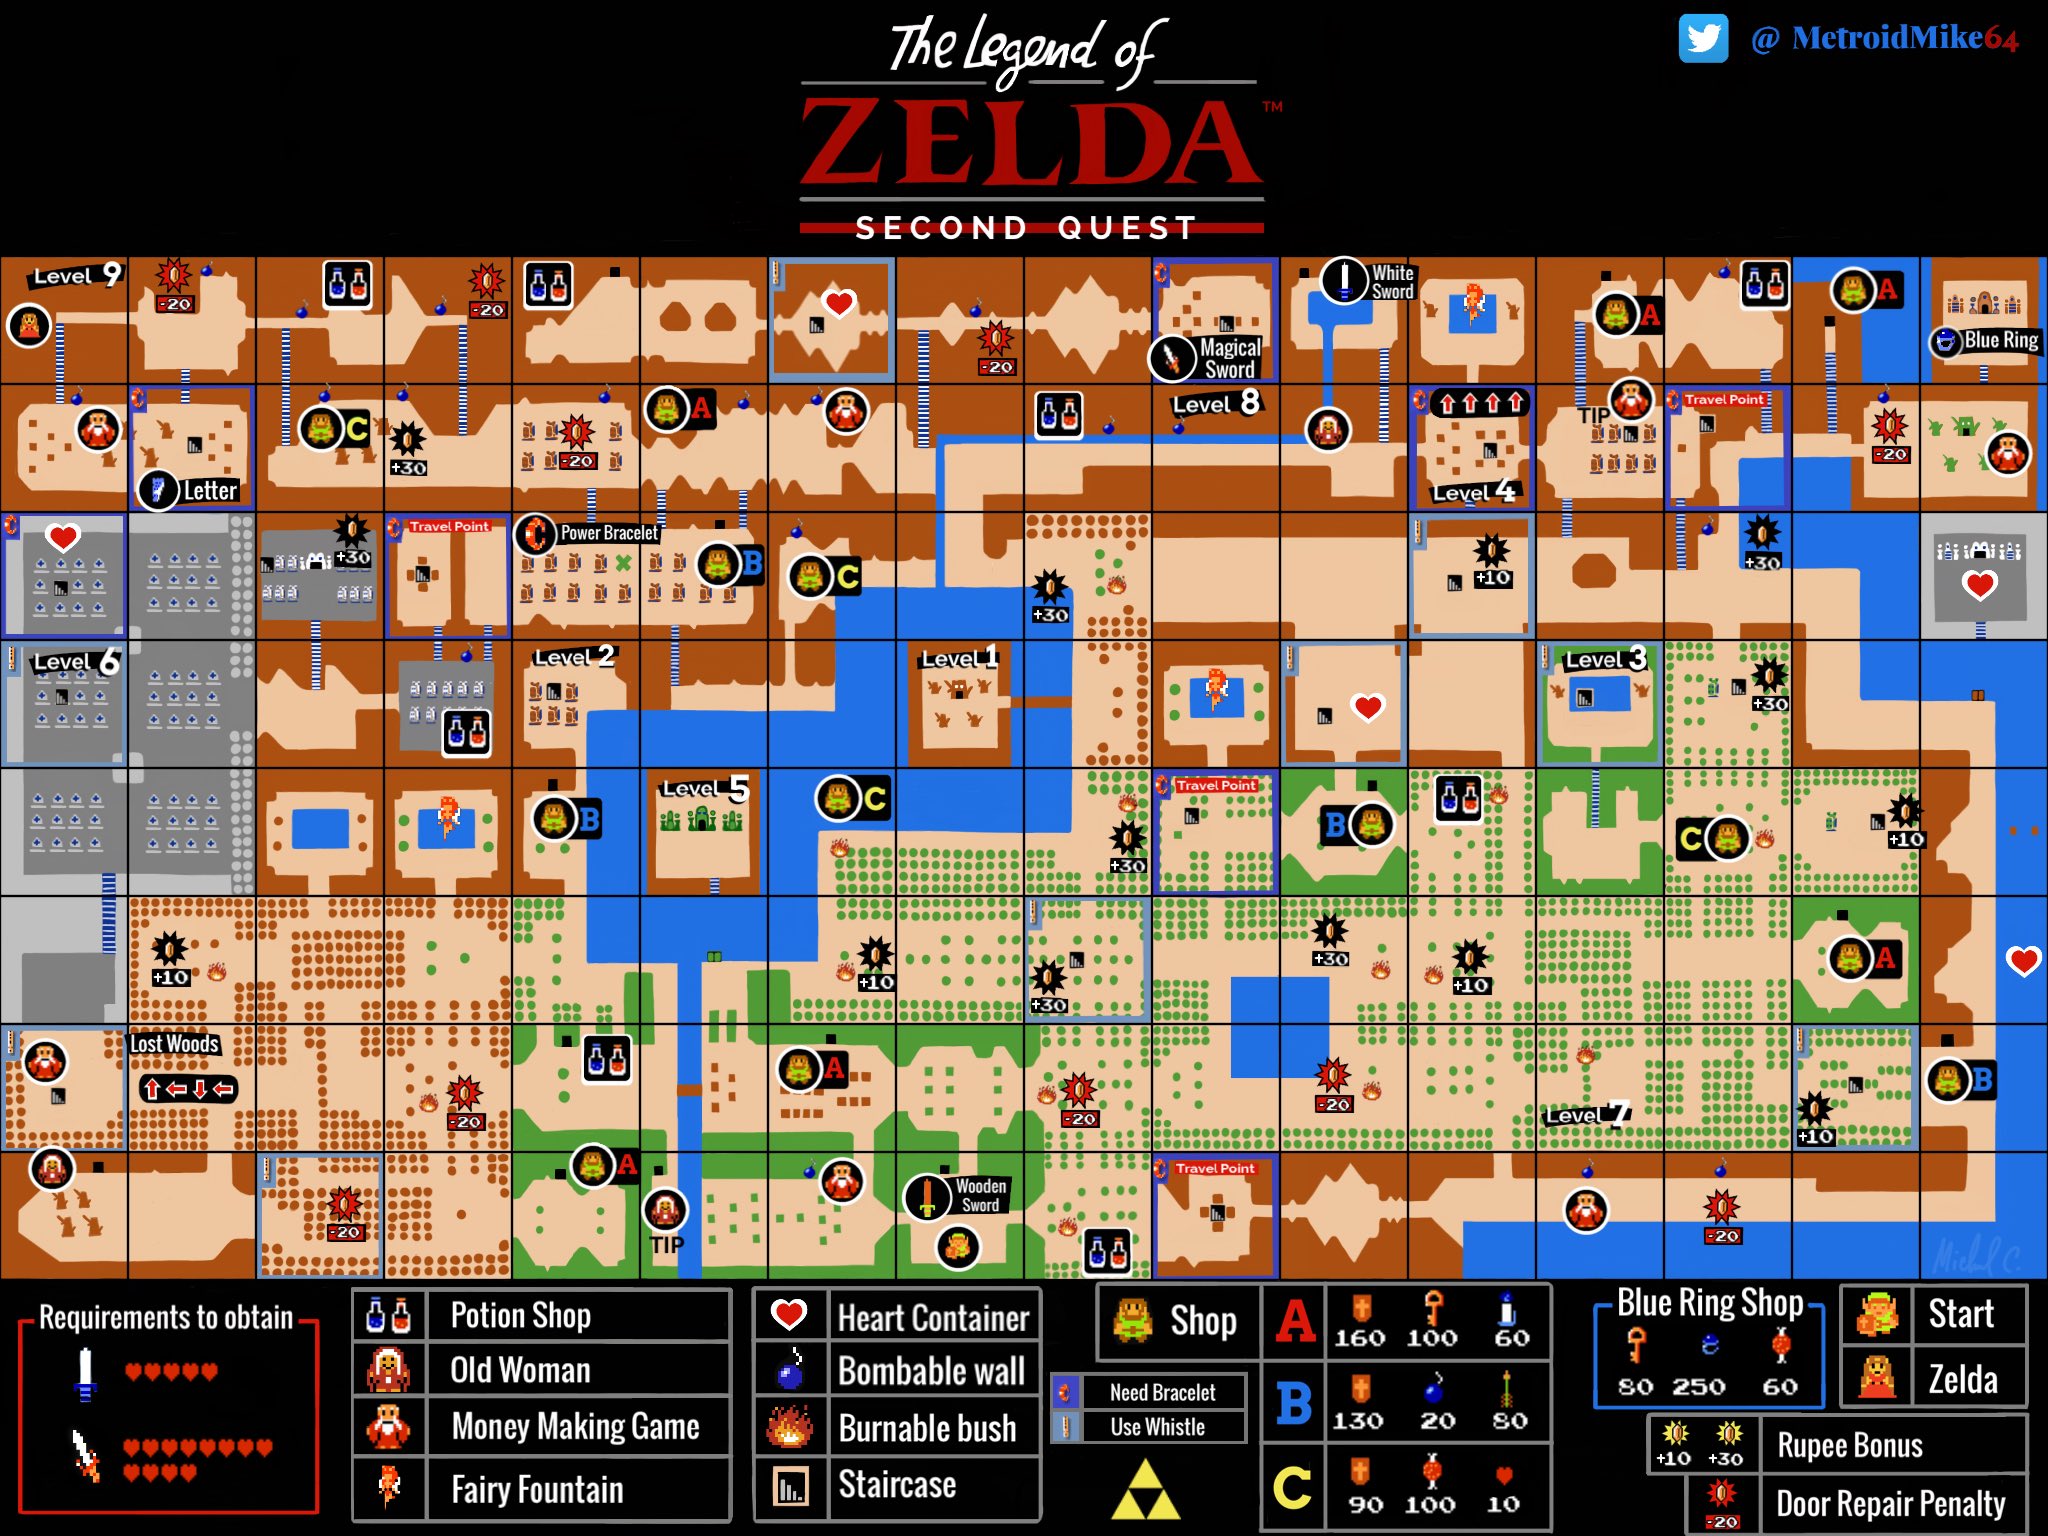
The overworld in the Second Quest has the same basic layout as the First Quest, but dungeon entrances and secret locations are completely different. Many cave entrances and shops have also been relocated.
Second Quest Dungeon Maps
Second Quest Dungeon Locations
| Dungeon | Location (Grid Coordinates) | How to Access |
|---|---|---|
| Level 1 | Overworld - Screen F4 | In a tree in the western area |
| Level 2 | Overworld - Screen A3 | Under a bush in the northeastern area |
| Level 3 | Overworld - Screen H8 | In the southeastern forest |
| Level 4 | Overworld - Screen G7 | Under a gravestone in the cemetery |
| Level 5 | Overworld - Screen B8 | Hidden under a rock in Death Mountain |
| Level 6 | Overworld - Screen D8 | In the central mountain range |
| Level 7 | Overworld - Screen E3 | Entrance in the shoreline of the lake |
| Level 8 | Overworld - Screen A4 | Hidden behind bombable rocks |
| Level 9 | Overworld - Screen E1 | At Death Mountain's peak |
Second Quest Secret Locations
| Item | Location | How to Access |
|---|---|---|
| Heart Container | Overworld - Screen C2 | Burn the lone tree in the clearing |
| Magical Sword | Overworld - Screen A6 | Need 12 heart containers to access |
| White Sword | Overworld - Screen F7 | Need 5 heart containers to access |
| Blue Ring | Secret Shop - Screen E6 | Purchase for 250 Rupees |
| Power Bracelet | Overworld - Screen D4 | Under a bush in isolated area |
Cheats & Tips for Second Quest
Essential Tips for Second Quest
- Bomb Everything - The Second Quest has many more hidden bomb walls
- Push All Walls - Many dungeon rooms have hidden passages behind pushable walls
- Use the Whistle - The recorder/whistle has new uses in the Second Quest
- Burn Every Tree - More secrets are hidden under burnable trees
- Stock Up on Keys - The Second Quest dungeons require far more keys
Second Quest Hidden Secrets
- Many more secret staircases appear when bombing walls in Second Quest dungeons
- Some rooms in the later dungeons can only be accessed through unconventional means
- The Power Bracelet location is completely different in the Second Quest
- Secret money-making locations have changed from the First Quest
- Heart Container locations are completely different
Second Quest Difficulty Tips
| Challenge | Solution |
|---|---|
| Invisible Walls | Use the map to identify suspicious gaps and check for hidden paths |
| Room Puzzles | Kill all enemies, check all walls by pushing, use bombs liberally |
| Maze-like Dungeons | Draw your own map as you explore, tracking one-way paths |
| Tougher Enemies | Get the White and Magical Swords as early as possible |
| Limited Resources | Find the secret rupee farming spots in the overworld |
Game Genie Codes
| Code | Effect |
|---|---|
| AAEOZGLA | Infinite Lives |
| YESOIAOA | Infinite Health |
| NYKEKXGK | Infinite Rupees |
| AAEUTAAO | Infinite Keys |
| AVUATOPA | Infinite Bombs |
| SXEPSVOU | Start with 8 hearts |
Second Quest Complete Walkthrough
Getting Started in the Second Quest
The Second Quest begins similarly to the First Quest, but almost everything is in a different location. Start by obtaining your sword from the Old Man in the starting cave, then begin exploring the overworld, keeping in mind that all dungeon entrances and most secrets are in different locations.
Important Initial Items to Find:
- Wooden Sword - From the Old Man in the starting cave
- Shield - Purchase from a shop for 60 Rupees
- Candle - Essential for finding many Second Quest secrets
- Extra Heart Containers - Find as many as possible before tackling dungeons
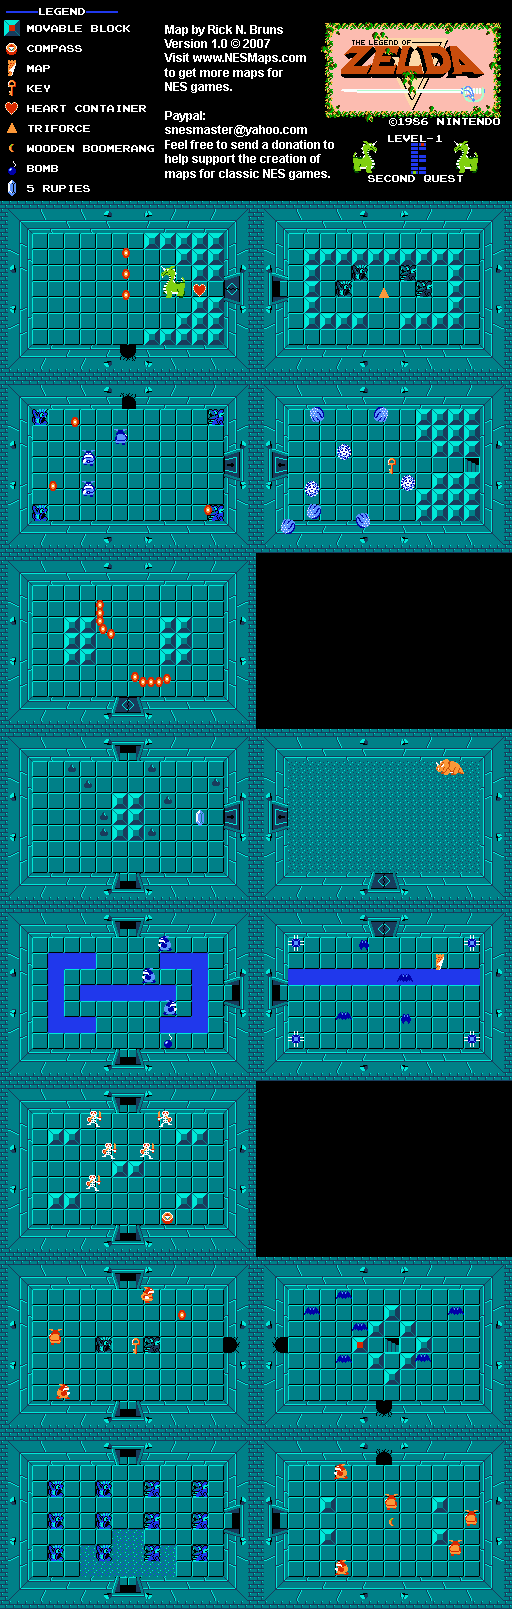
Level 1
Located in the same spot as the First Quest's Level 1, on an island in the center of Lake Hylia. Access it by crossing a bridge from the east.
Key Items:
- Boomerang - Obtained by defeating five Red Goriyas in the room east of the entrance. Useful for stunning enemies and retrieving distant items.
Boss: Aquamentus
A green dragon that shoots fireballs. Use your sword to defeat it while avoiding its attacks. Collect the first Triforce fragment upon victory.
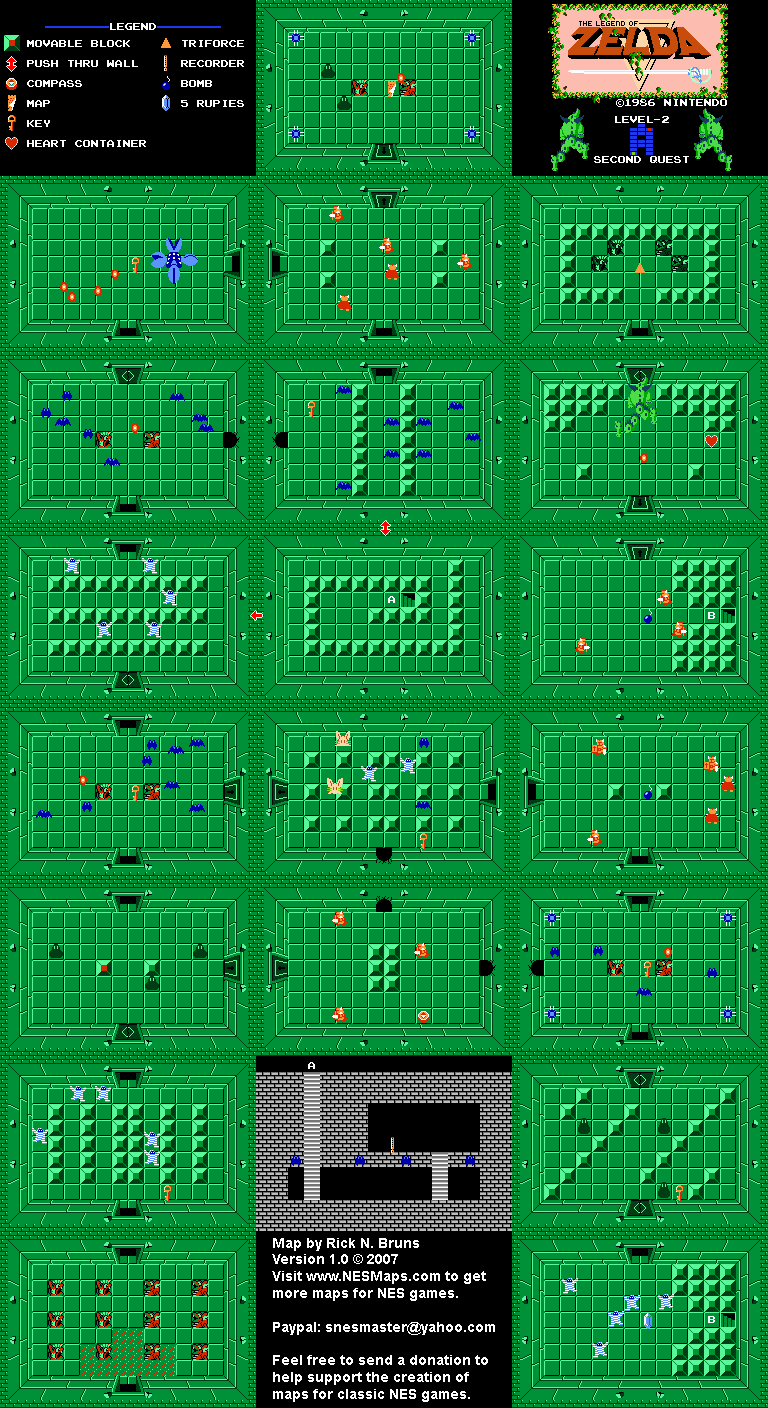
Level 2
Found beneath an Armos statue on the western shore of Lake Hylia, where the Blue Ring was located in the First Quest. Touch the correct statue to reveal the entrance.
Key Items:
- Recorder - Used to uncover secrets and manipulate certain enemies.
Boss: Gleeok
A two-headed dragon that becomes more aggressive as each head is destroyed. Attack carefully while avoiding its attacks to claim the second Triforce fragment.
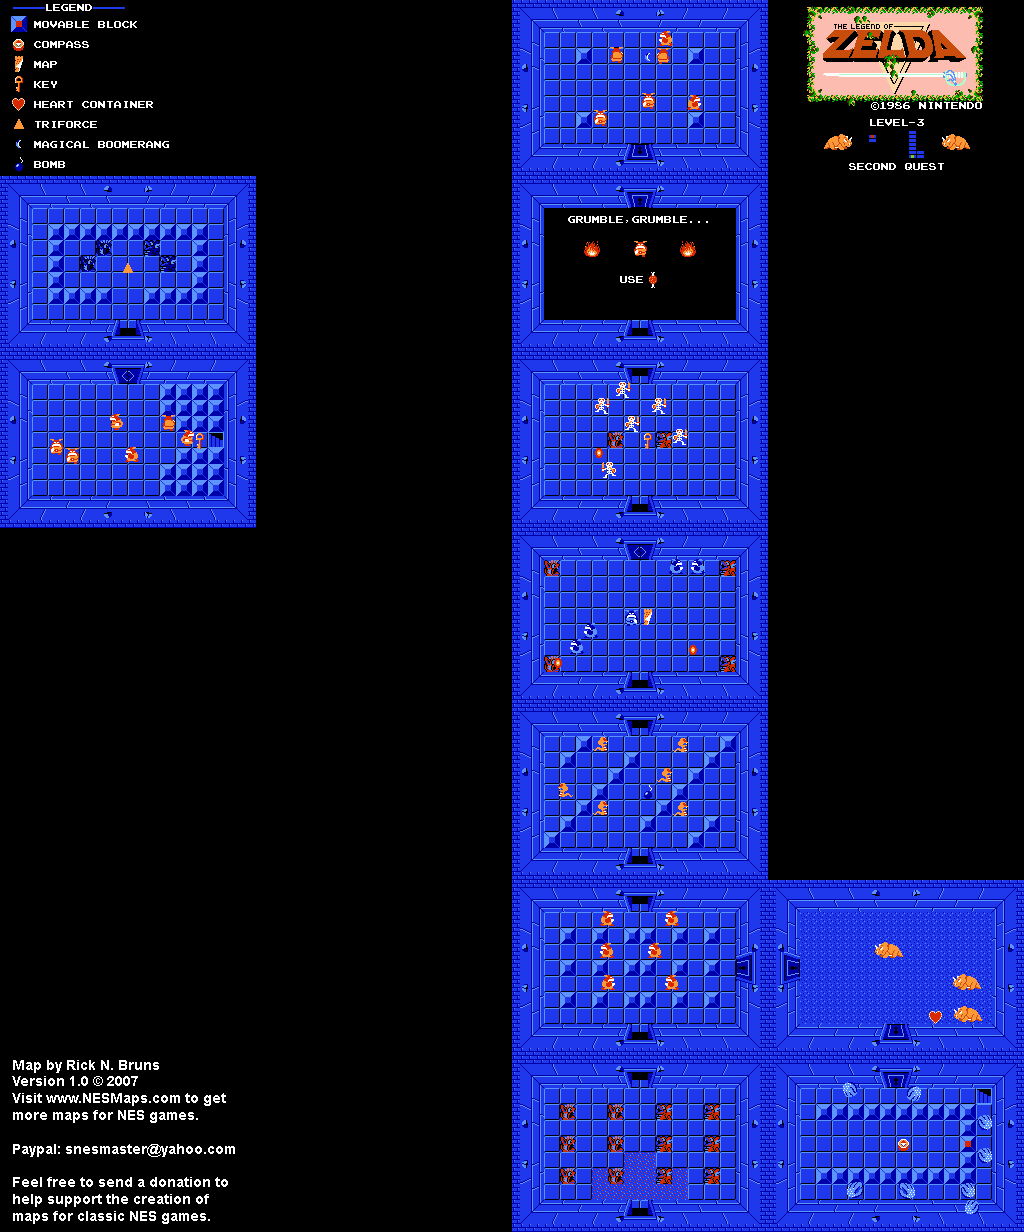
Level 3
Located where Level 2 was in the First Quest. Play the Recorder to reveal the entrance.
Key Items:
- Magical Boomerang - An upgraded Boomerang that travels farther. Requires Food to pass a hungry Goriya blocking the path.
Boss: Dodongo Trio
Three Dodongos that must be defeated using bombs. Place bombs in their path to make them consume them, causing damage.
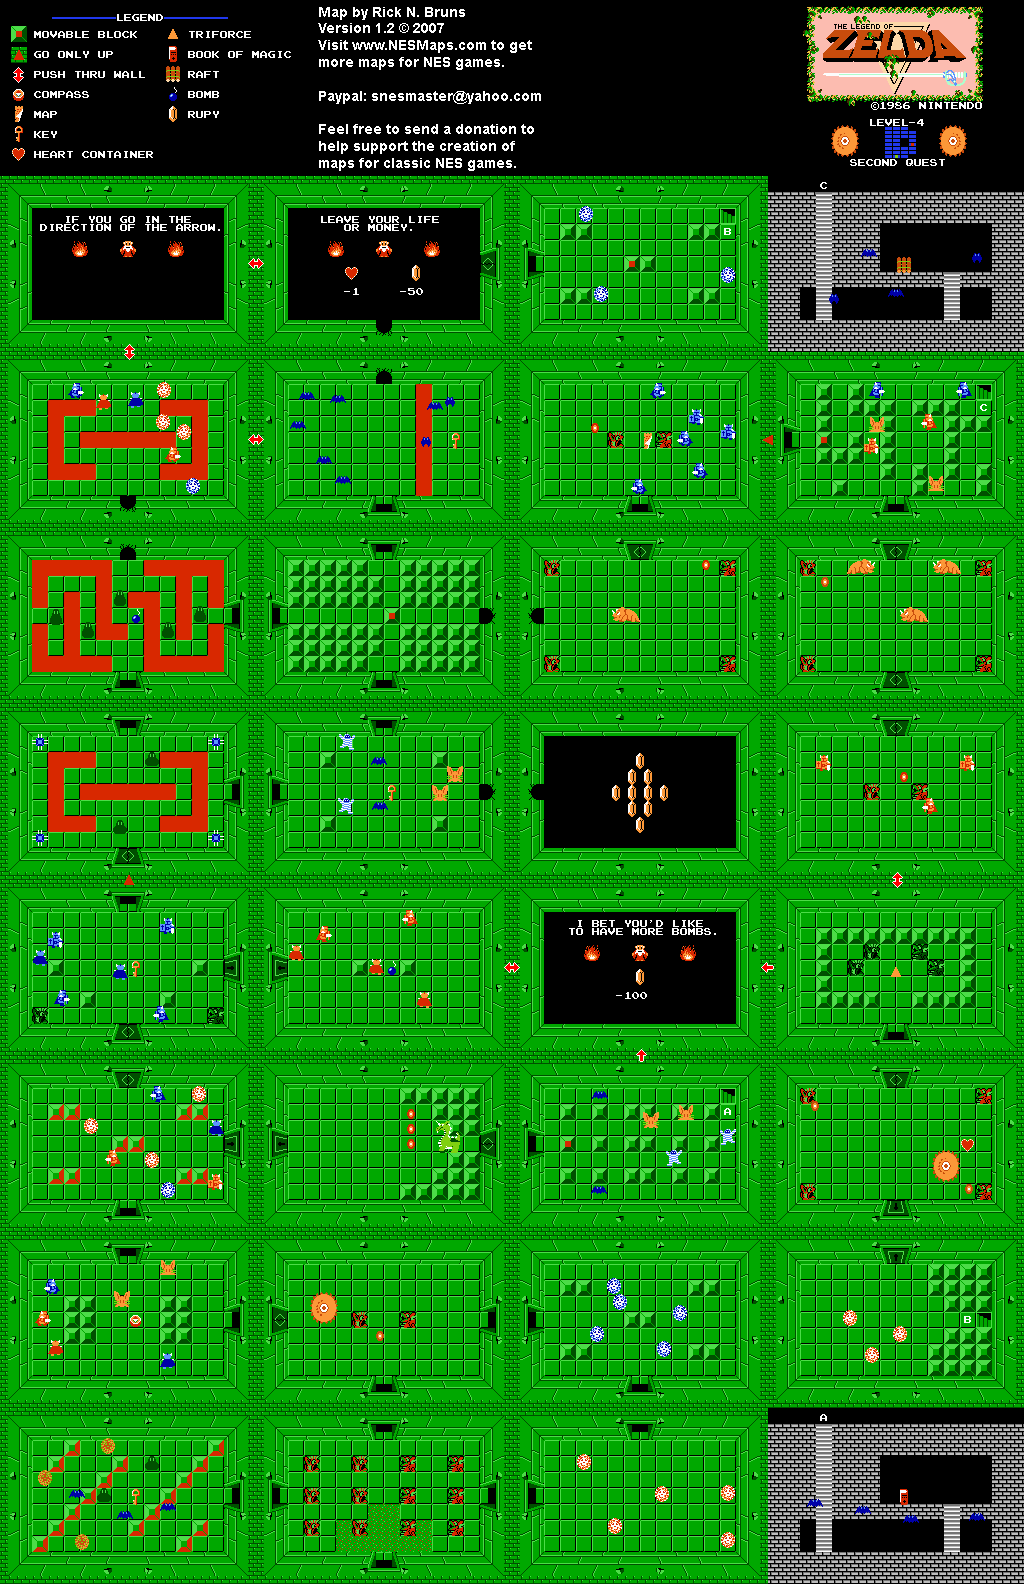
Level 4
Hidden within the Lost Hills. Push a specific boulder to reveal the entrance.
Key Items:
- Raft - Allows access to new areas across water.
- Book of Magic - Enhances the Magical Rod's projectiles with fire.
Boss: Digdogger
A creature vulnerable to the Recorder. Play it to shrink Digdogger, then attack with your sword.
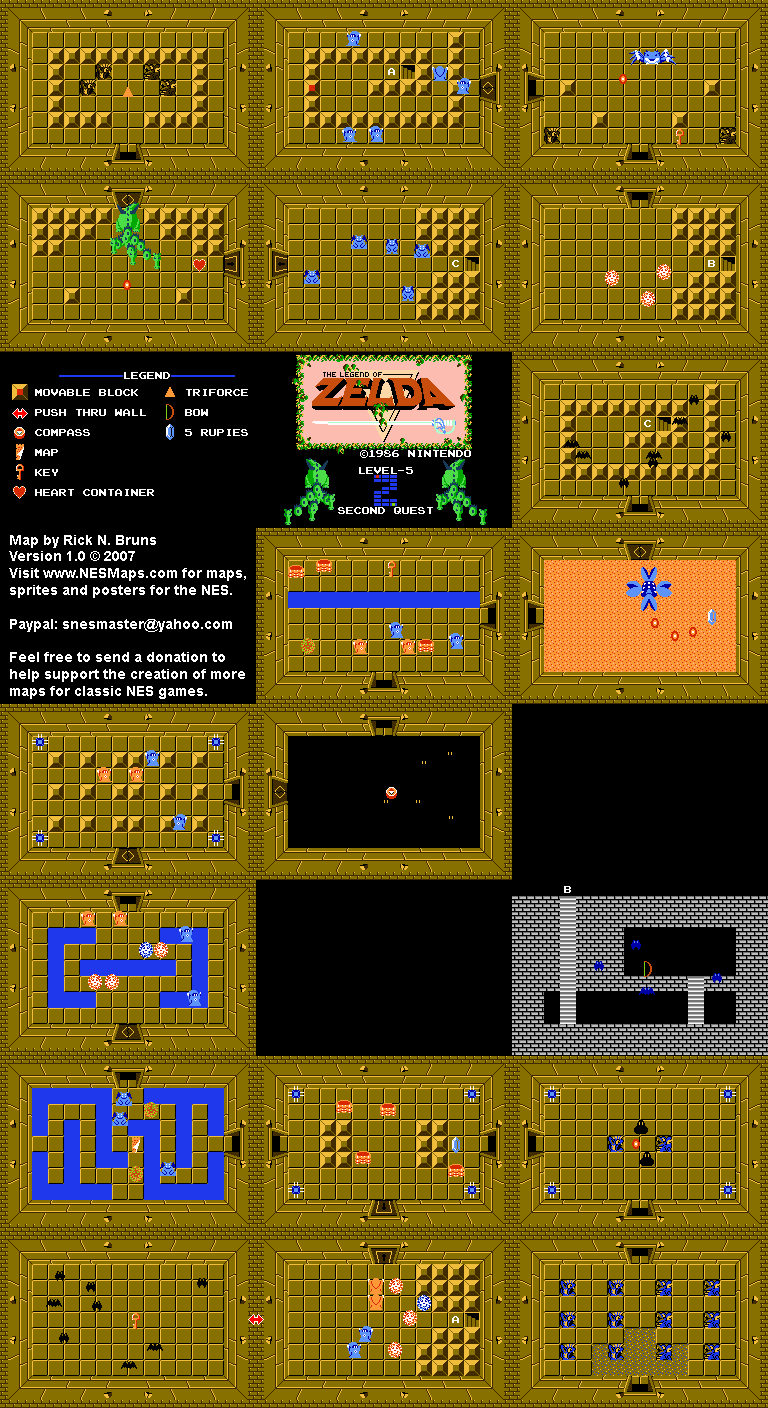
Level 5
Located where Level 4 was in the First Quest, accessible only by using the Raft.
Key Items:
- Bow - Essential for defeating certain enemies and bosses.
Boss: Gleeok (Three-Headed)
A more challenging version of Gleeok with three heads. Focus on one head at a time while avoiding fireballs.
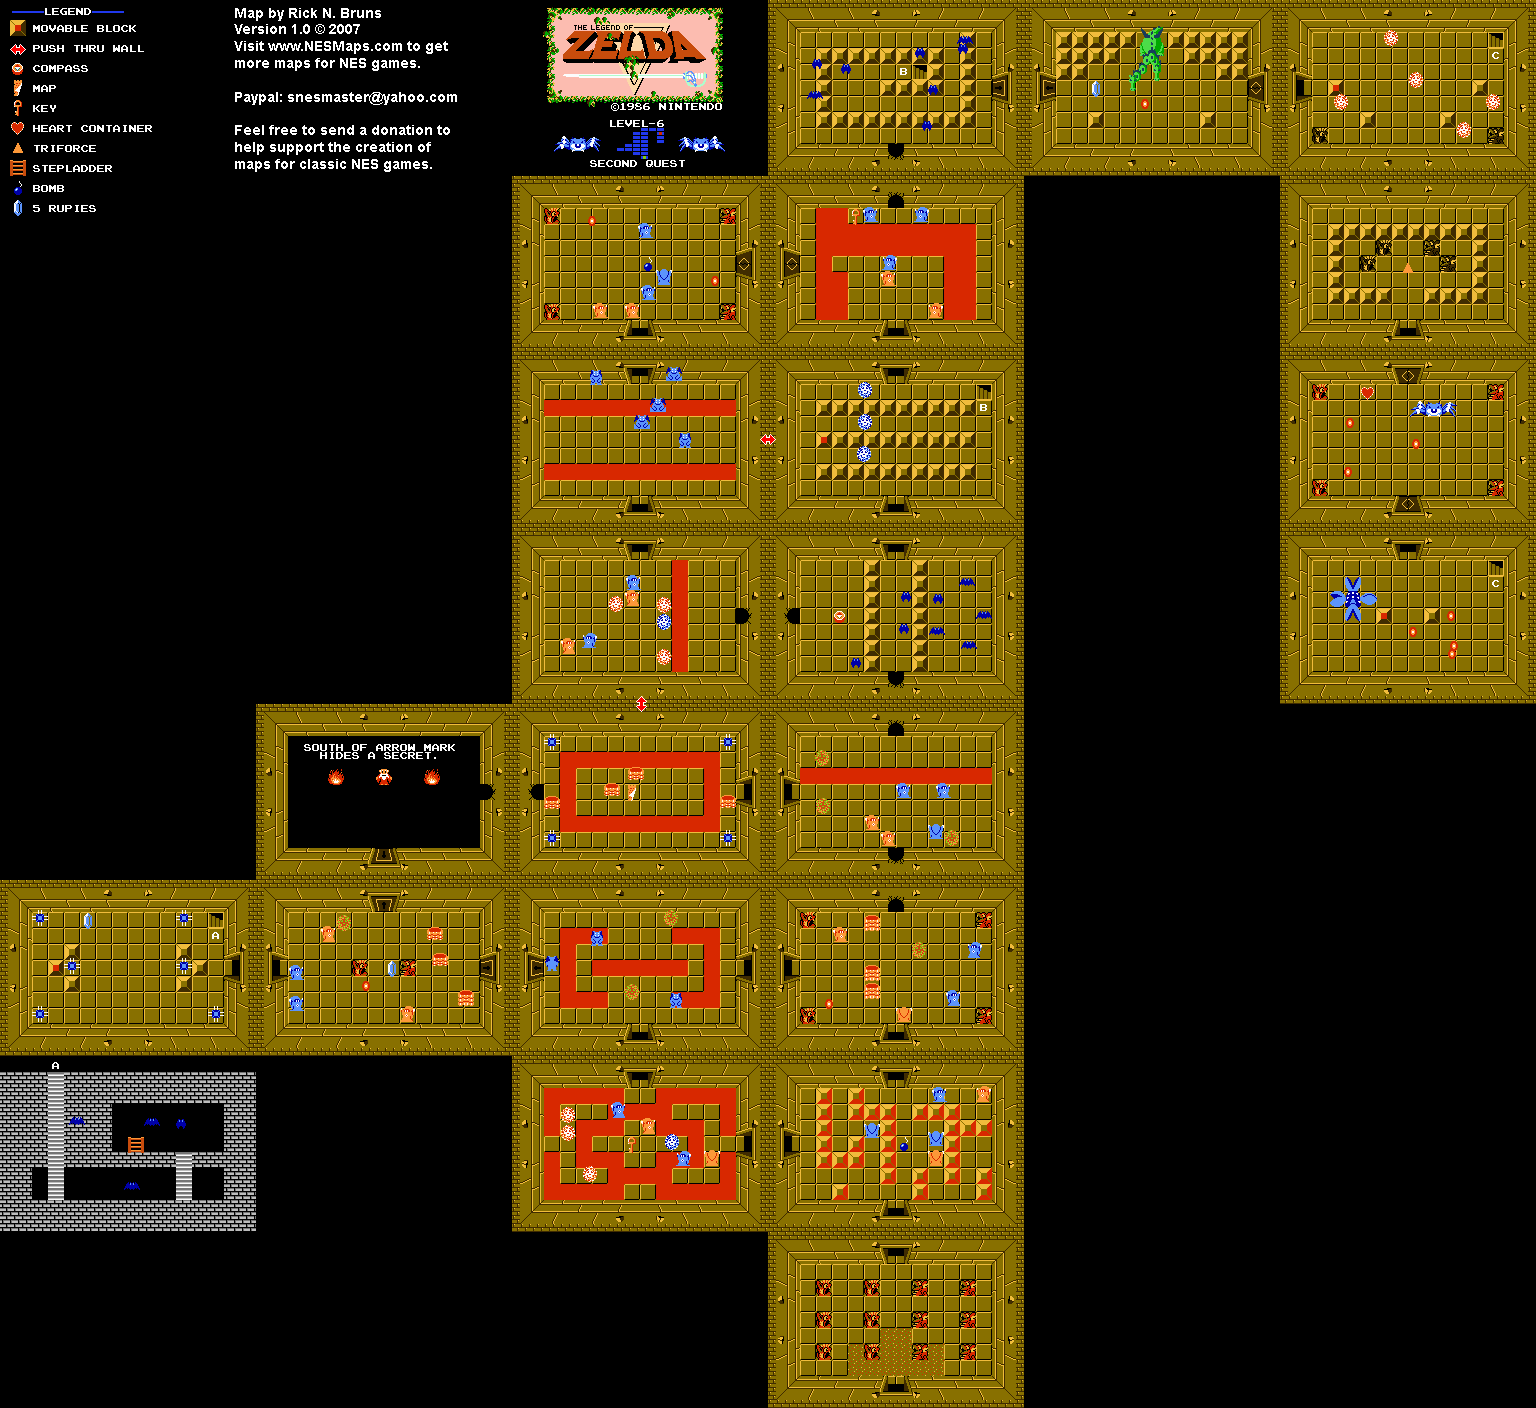
Level 6
Located in the Graveyard, under a tombstone. Play the Recorder to reveal the entrance.
Key Items:
- Stepladder - Essential for crossing small gaps and reaching previously inaccessible areas.
Boss: Gohma
A giant crab-like creature with a single eye. Wait for its eye to open and shoot it with an arrow to defeat it.
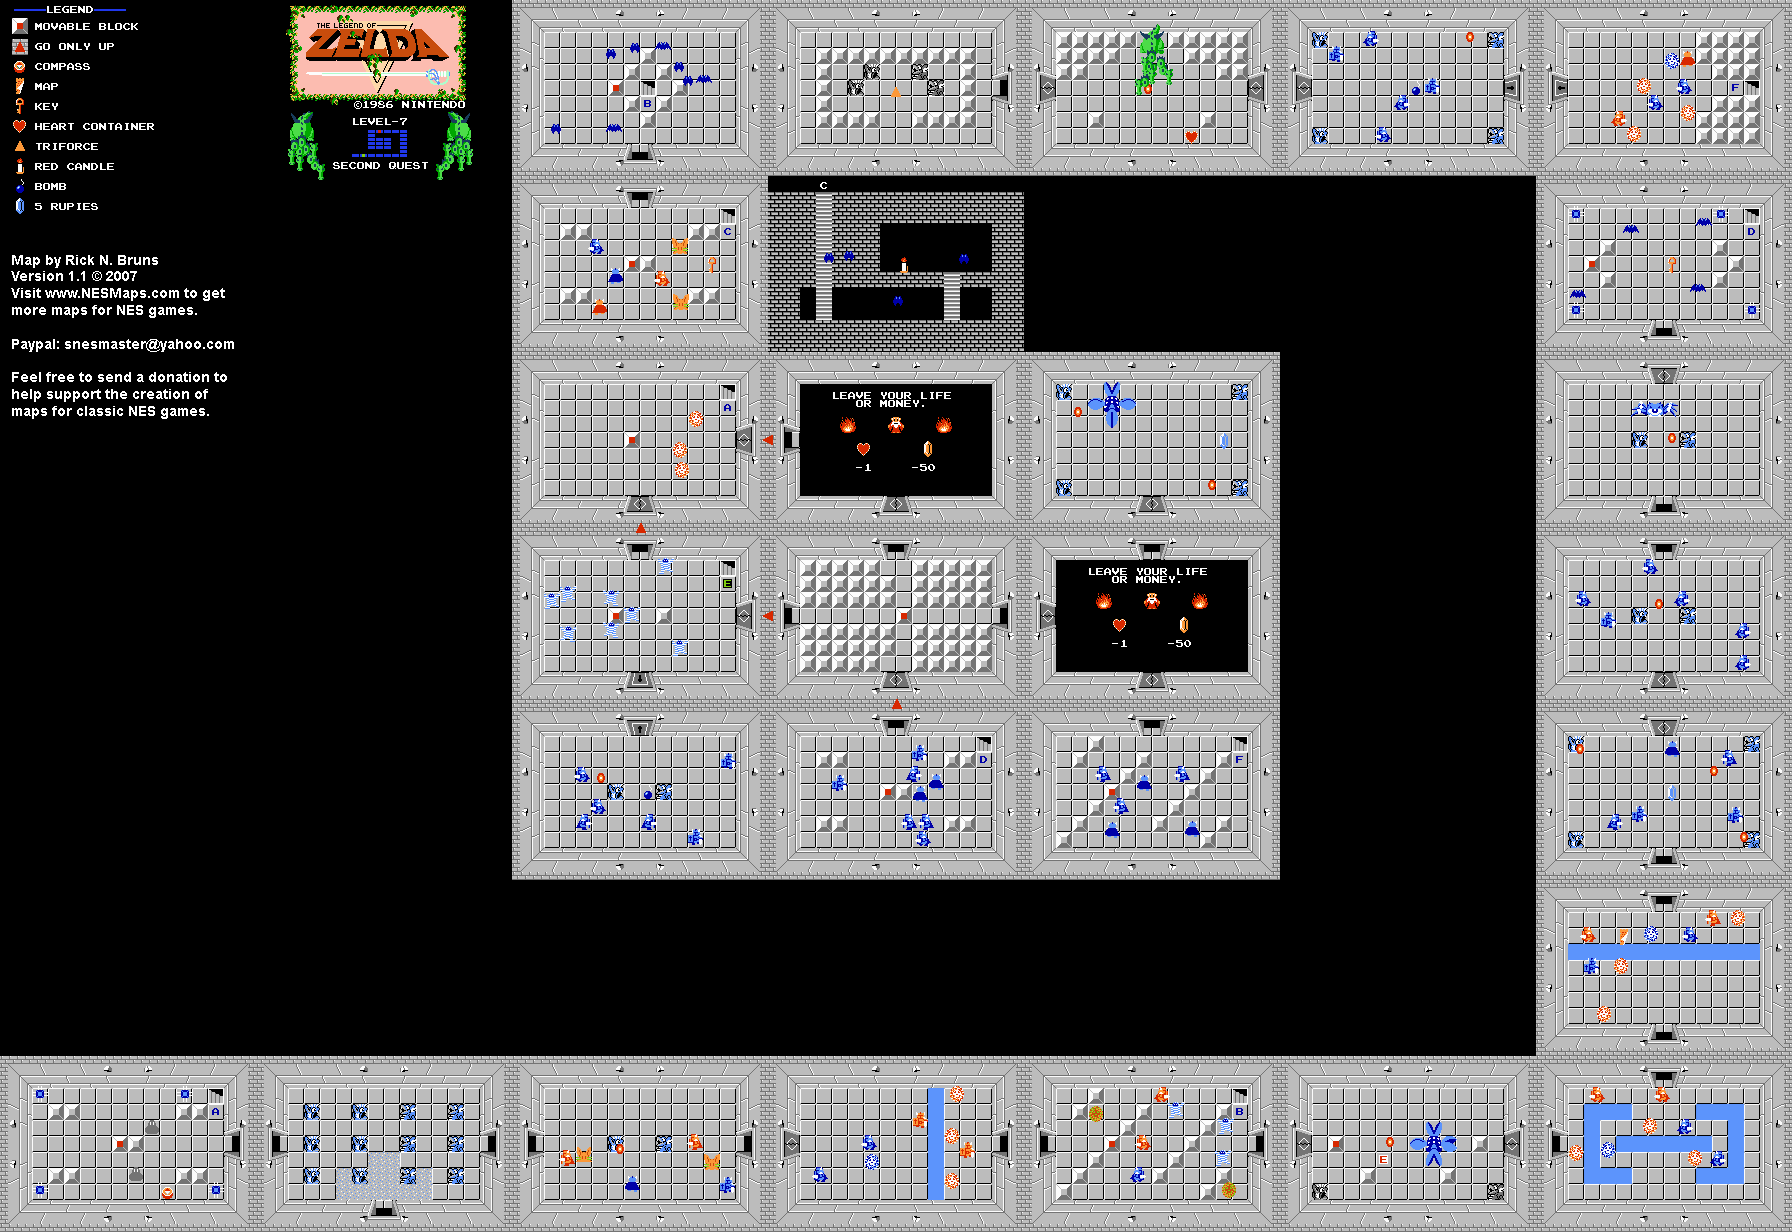
Level 7
Found west of Level 8's location in the First Quest. Burn a bush to uncover the entrance.
Key Items:
- Red Candle - Can be used multiple times per screen to burn enemies and reveal secrets.
Boss: Gleeok (Four-Headed)
An even more formidable Gleeok with four heads. Carefully maneuver to attack each head while dodging numerous fireballs.
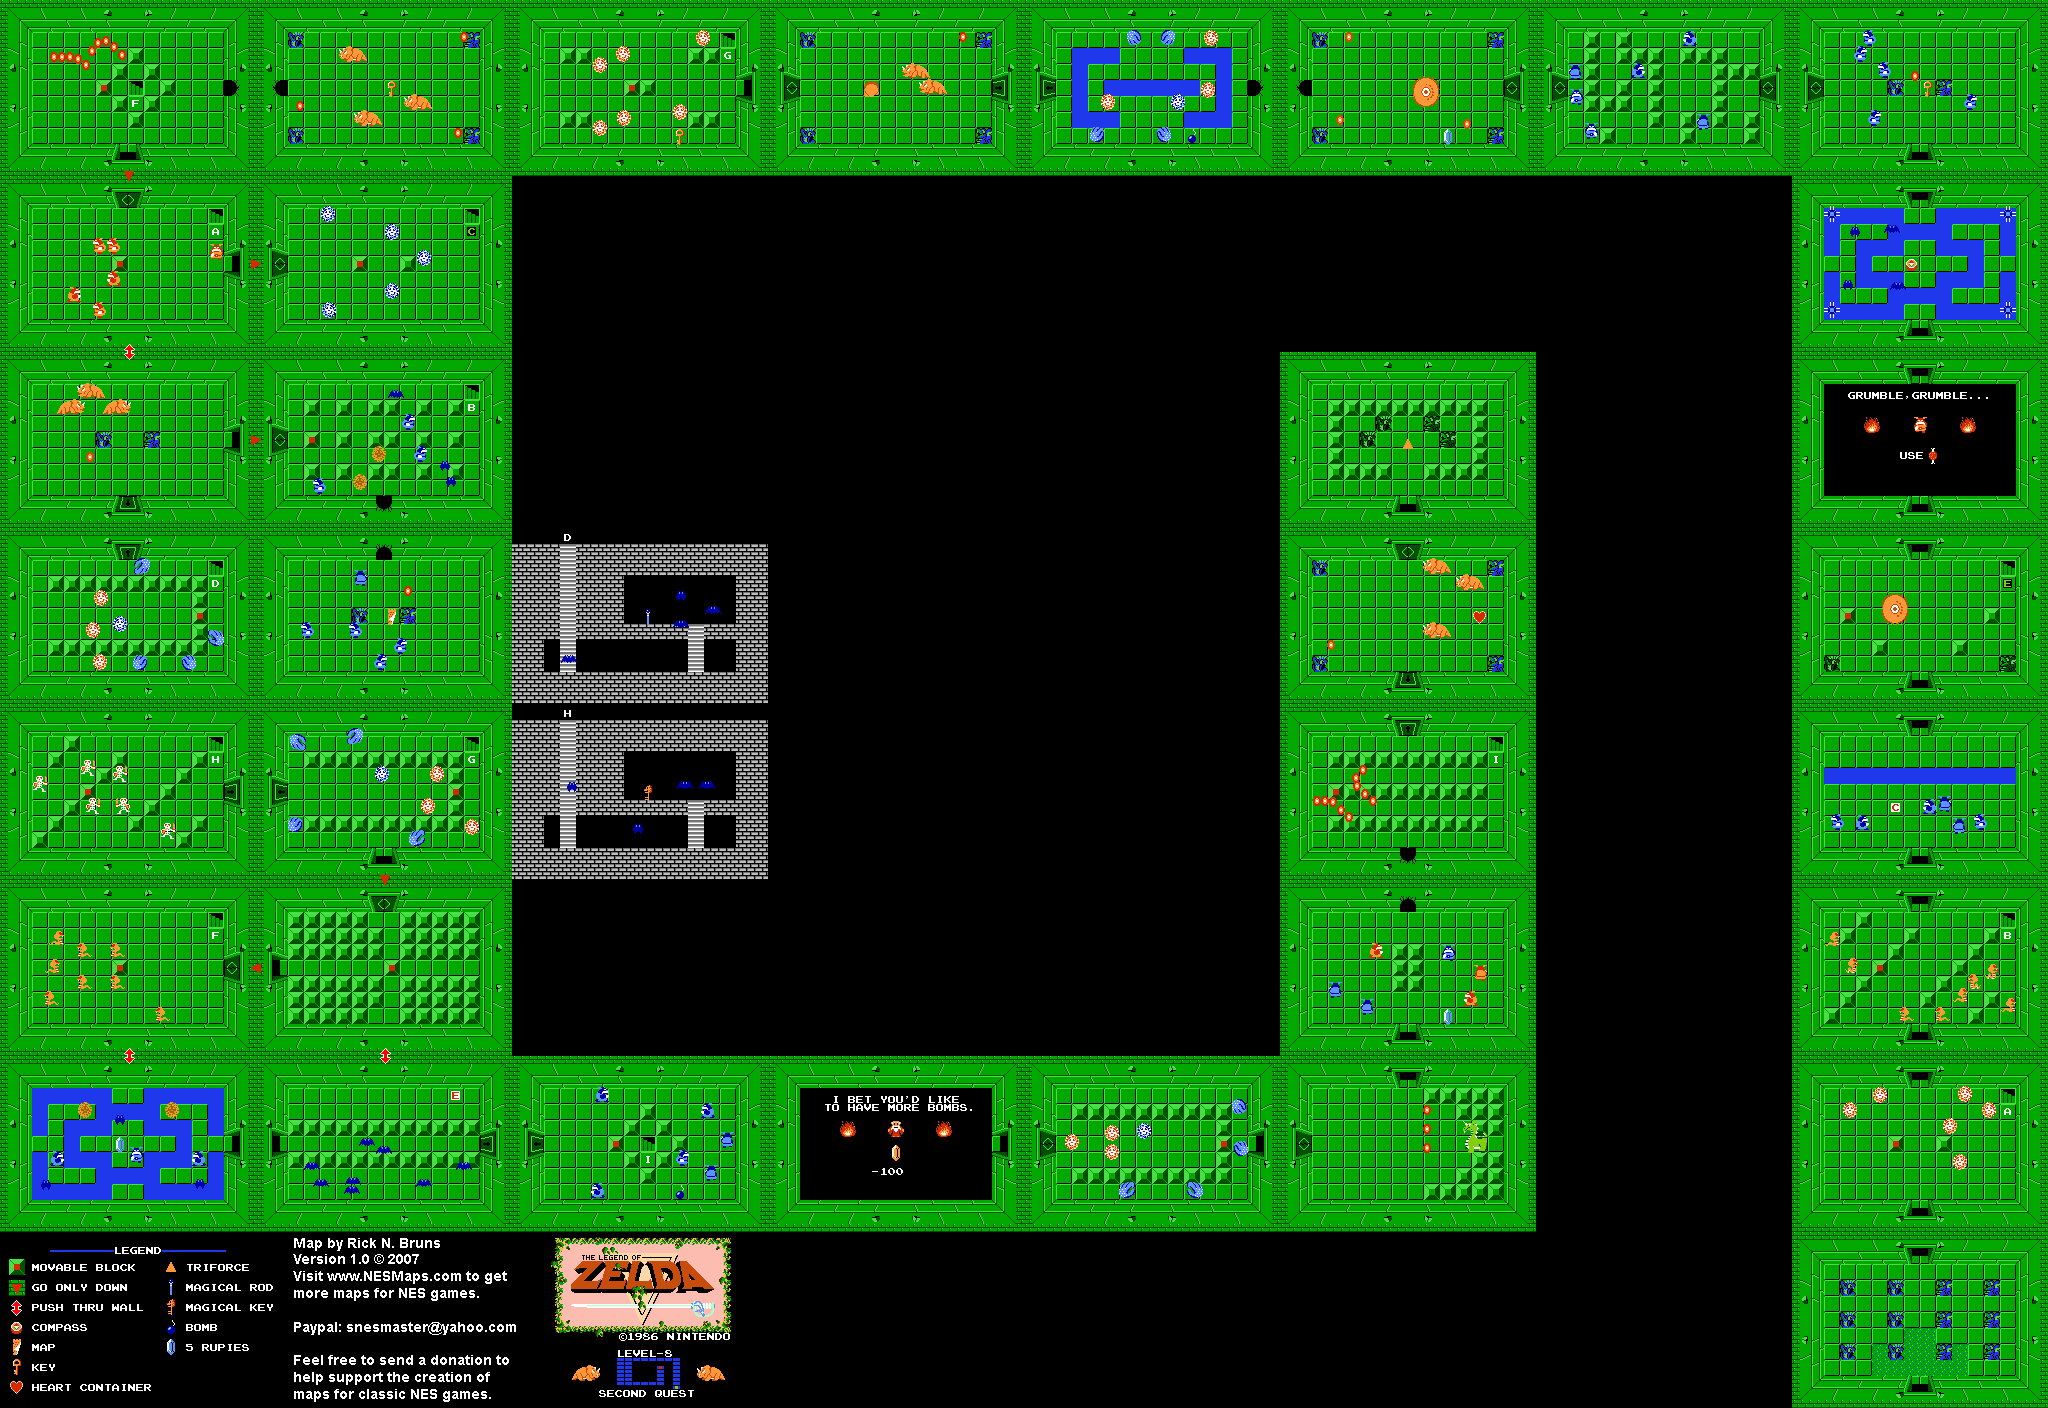
Level 8
Located one screen left of the waterfall below Death Mountain. Use the Stepladder to stand on the river and bomb the wall to reveal the entrance.
Key Items:
- Magical Rod - Allows you to shoot magical projectiles; effective against many enemies.
- Magical Key - Unlocks any door without needing regular keys.
Boss: Dodongo Trio
Another encounter with three Dodongos. Use bombs strategically to defeat them.
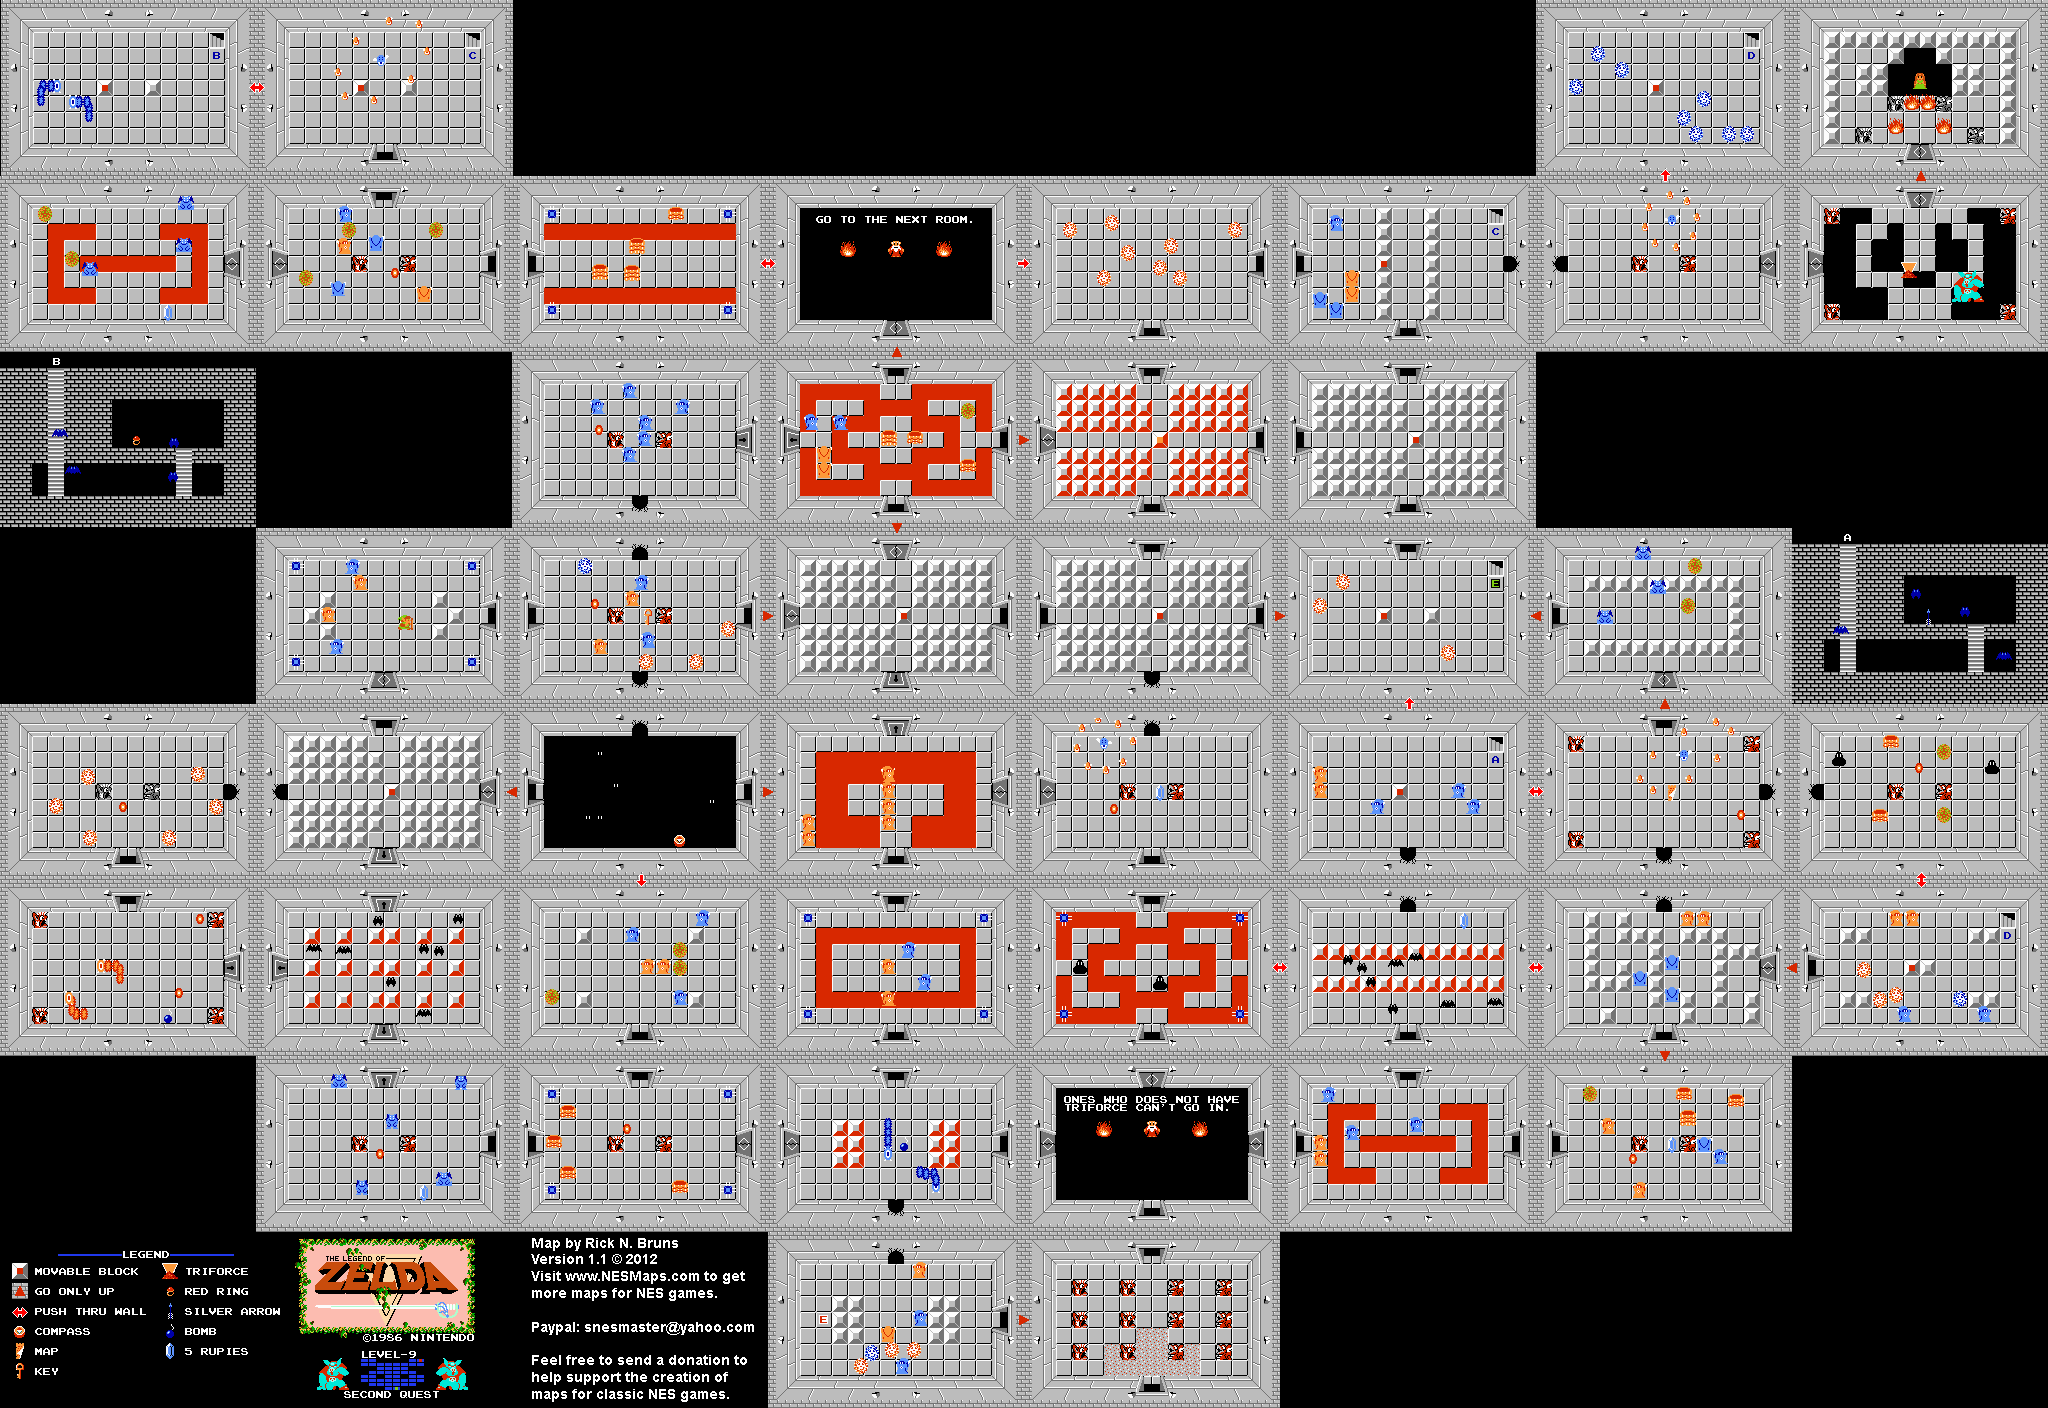
Level 9
Located in the northwestern-most square on the map. Bomb the wall to find the entrance. Requires all eight Triforce fragments to enter.
Key Items:
- Red Ring - Reduces damage taken by 75%.
- Silver Arrow - Required to deal the final blow to Ganon.
Final Dungeon and Ganon - Second Quest
Located at Death Mountain's peak in Screen E1. This final dungeon is a complex labyrinth with many invisible walls, fake walls, and one-way passages.
Before entering Level 9, ensure you have:
- All previous Triforce pieces
- Silver Arrows (found in Level 9)
- Magical Sword (essential for the Second Quest)
- Red Ring (critical for damage reduction)
- Several potions and maximum heart containers
Navigation Tips:
- Level 9 in the Second Quest has many more hidden passages than in the First Quest
- The path to Ganon involves multiple invisible paths and bombable walls
- Several decoy paths exist that lead to dead ends
- The Silver Arrows are hidden behind an invisible wall in the northwest section
Defeating Ganon:
- Ganon is invisible more frequently in the Second Quest
- Hit him with your sword to make him briefly visible
- When visible, strike him with a Silver Arrow
- He requires more hits than in the First Quest
- Once defeated, collect the Triforce of Power and rescue Princess Zelda
Additional Second Quest Resources
Item List
| Item | Effect | Location |
|---|---|---|
| Wooden Sword | Basic attack weapon | Starting cave |
| White Sword | Stronger sword (requires 5 hearts) | Overworld - Screen D5 |
| Magical Sword | Strongest sword (requires 12 hearts) | Overworld - Screen A8 |
| Blue Ring | Reduces damage taken by half | Secret Shop - 250 Rupees |
| Red Ring | Reduces damage taken by 75% | Level 9 |
| Magic Boomerang | Travels further than regular boomerang | Level 2 |
| Silver Arrows | Required to defeat Ganon | Level 9 |
Fan Art Gallery
History of The Legend of Zelda
The Legend of Zelda was first released in Japan on February 21, 1986, for the Famicom Disk System. It was later released in North America on August 22, 1987, for the Nintendo Entertainment System. The game was designed by Shigeru Miyamoto and Takashi Tezuka, with music composed by Koji Kondo.
The game sold over 6.5 million copies, making it one of the most successful NES games of all time. Its success spawned a franchise that has become one of Nintendo's most popular and enduring series.